Tuesday 30 April 2013

Cocoa Nymph...

Last week I had one of the best mid-week nights ever!  The evening was spent with a fabulous friend, surrounded by chocolate...it really doesn't get much better than that on a Tuesday.  So, what did I do you ask?  I went to Cocoa Nymph's Chocolate Workshop. 
 
The night started off with a pleasant surprise...a mouth watering truffle made by Cocoa Nymph's nymphs.  Talk about a good way to create a happy audience right off the bat.

Next up was a brief lesson on the history of chocolate, how it is made, and how Cocoa Nymph came to be.  Personally I liked the show and tell factor.  The items above are (starting at the top left and going clockwise): cocoa nibs, cocoa beans (the nibs are in the beans), a pod with cocoa beans in it, untempered chocolate and a cocoa pod.
 
Interesting facts learned during the presentation:
  • The cocoa pod above was grown in Vancouver...in the Stanley Park aquarium!  How cool is that?
  • Cocoa pods are normally 3-4 times that size.
  • Cocoa Nymph was started by a lady who only had $80 to make it through the winter one year in university.  She invested the $80 in a good bag of chocolate and made a batch of truffles.  She ended up making 3000 chocolates that winter to support herself and decided that maybe truffles were the way to go rather than micro-biology.
  • When Cocoa Nymph offered their chocolate workshop on groupon, they sold over 1200 groupons in 24 hours.  As a result, they made their largest chocolate purchase ever: 2000 pounds!!!  I wish I could have seen that. 
Next, we moved into the magic room of chocolate, put on our stylish hair nets, washed our hands and got down to the business of chocolate tasting.  The tasting consisted of 6 different varieties: cocoa butter (tasted waxy), 4 different single origin chocolates of different dark percentages, followed by cocoa nibs.  Interesting fact: chocolates from different regions have different flavours, just like wine.  The best way to taste the flavours of chocolate is to break it, smell it and then place a piece on your tongue and let it melt before chewing.
 
The big slab of chocolate was chocolate ganache and leads me to the best part of the night...learning how to make truffles!!!

 The dark chocolate tempered just right and ready to enrobe our fabulous truffles.
 
My ganache cut into my truffle shapes.  We literally used mini-cutters like you would for cookies.  It was very neat...

...albeit a bit messy!  And, yes, I did lick my hands.

The toppings to decorate our truffles.  Left to right: transfers and texturizers, cocoa nibs, cocoa powder and strawberry flakes.

My favourite part was enrobing the chocolate ganache.  You literally dropped your chocolate ganache shape into a vat of chocolate like it was doing a belly-flop into a pool, then you covered it with chocolate, tapped it against the top of the chocolate vat to get the excess chocolate off, and took it out to harden.  I have no idea why, but dropping the chocolates in never ceased to entertain me. 

Enrobing my chocolates!

My chocolates decorated and ready for the fridge.

Out of the fridge and ready for boxing!  It took every ounce of will-power not to eat them at this point.

My fabulous chocolate-making partner in crime's creations boxed up and ready to take home.  Note the lack of blobs surrounding the truffles...much more professional looking than mine.

However...the blobs led to more chocolate to be eaten...mwah ha ha ha!  My truffles boxed up and ready to be taken home.

Cocoa Nymph's creations and list of yummy treats...including drinking chocolate!
 
I thoroughly enjoyed this evening, as did my chocolate-making partner in crime and will definitely use my newly learned techniques for future gift giving.  I would highly recommend this evening for a fun night out.  (Cost: $70 plus tax/per person regular price. Or, if you're lucky like me and see it on Groupon, you can get it for $35 plus tax. So keep those eyes peeled!) 
 
However, if you're more interested in eating chocolate than making it, you should still make a trip to Cocoa Nymph.  Their truffle creations are scrumptious!
  
Twitter: @cocoanymph
 

Monday 29 April 2013

The Kiss of the Mangal...

You know how some kisses are lack luster and others are full of fireworks and weak knees?  Well, Mangal Kiss goes beyond the fireworks and provides a full-on food orgasm!  If you are only ever going to try one food truck in Vancouver, make sure it's Mangal Kiss.  The food is unreal, the lady and gent who own the truck are lovely, everything is fresh and flavourful, the quantity is just right, and the prices are the best I've seen.  Good to see you back on the streets after your winter hiatus Mangal Kiss!

So, what is Mangal Kiss?  It's a mid-east BBQ truck that makes amazing wraps full of grilled kabobs, fresh veggies and what tastes like homemade sauces.  I'm not going to lie, for the longest time I would walk by the truck and the smells would torture my tastebuds, but I didn't know how to order, so I'd stick with what I knew.  Word to the wise, don't make the same mistake.  It's easy.  Simply pick your meat and say, "I'd like the chicken/beef/lamb wrap, please" and leave the fixings to the masters.  You won't be disappointed.

Things to note: (1)  The meat is not grilled until you order your food.  Much more scrumptious than having it pre-cooked and kept warm, but it does mean that it will take a few minutes to get your order.  So, leave yourself about five minutes from the time you order until you get your food.  (2) It looks like they're offering a wrap and small home-made soup combo now for $10.  And (3) they are located on the Georgia side of the Art Gallery, so there is plenty of lovely steps to sit, visit and eat on after getting your yummy goodness.

The new truck!  So cute.  Who knew such delicious food could come out of a horse trailer?

The menu.  You can't go wrong with any choice.

First Mangal Kiss of the season!  So excited!!!

My yummy in my tummy Lamb Kebab: served on pita, with organic young greens, cucumber, radish, shaved daikon, fresh mint and hummus.  ($8, tax included).  I barely came up for a breath and, when I did, my tastebuds gave me a scolding!  It was the perfect amount for lunch.

A home-made truffle for dessert, thanks to my Cocoa Nymph adventure (details included in tomorrow's post).  The perfect end to a scrumptious lunch!
 
Twitter: @MangalKiss

Friday 26 April 2013

A gluten-free, dairy-free childhood favourite...

I went for lunch with a friend this week and with the amazing weather we decided that a food truck was a must!  The only catch was that this lovely lady is gluten-free and dairy-free, so I started doing some research into which trucks offer options that would satisfy her tummy's desires.  I was pleasantly surprised with how many options there were, but when I mentioned Mom's Grilled Cheese she was sold.  She said that she'd walked by this truck many a time and didn't even stop to look because she didn't want to torture herself over the fact that she couldn't have it...but turns out she can!

On to the food...

The gluten-free bread, daiya vegan cheese grilled cheese sandwich with tomatoes, double pickles and chips.  (Approximately $10).  We were both impressed with the fact that she got two sandwiches since the bread is so much smaller.  And, for the record, she thoroughly enjoyed it!
 
Also, for all of you dairy-free folk, take note that the Friday special (the La Di Da) is made with goat's cheese and prosciutto, so then you wouldn't even have to pay extra for the Daiya vegan cheese.

My all-time favourite classic: sour dough bread, cheddar cheese, tomatoes, single pickle, chips and a shot of tomato soup for dipping.  ($10 exactly).  Delicious!

Our view during lunch.  It really doesn't get any better than this.
 

Thursday 25 April 2013

Wavy vs. flat

As I was leaving the Canucks game the other night (GO CANUCKS GO!!!), I was given a free bag of Lays ketchup potato chips.  I'm not going to lie, Ketchup is one of my favourite flavours...right up there with All Dressed and Salt & Vinegar, although Salt & Vinegar definitely takes the cake.  So, needless to say, I was a little pumped.

I broke open the bag and discovered the chips were wavy!  I was completely taken aback.  My first thought was "Lays chips don't have ripples."  Once I got over the initial shock, I was able to confirm that they taste exactly like the smooth Lays.  So, for all of you out there who have steered clear of Lays because they're smooth and edgeless...you no longer have to deny yourself of Lays yumminess!


Wednesday 24 April 2013

Second time's a charm...

It was my fabulous vegan friend's 30th birthday recently, so guess where I had the pleasure of eating?  Nuba!!!  However, this time it was at their Kits location for dinner.  I didn't think it could get any better than the lunch I had at Gastown...but it did!

The food selection was completely different but every ounce as delicious, and the restaurant was amazing.  It had a fabulous mediterranean feel to it.  White walls, bright blue tiles, different rooms and levels...I loved it!  Definitely the sort of place that would be great to book for a group.  Speaking of which...they do take reservations and I'd recommend making one.

So, in summary, Nuba is officially batting 100% in the scrumptious stats.

Najib's Special: crispy cauliflower tossed with lemon and sea salt, served with tahini. ($7.50)  Who can resist this yummy goodness?  I can whole heartedly vouch that this dish is a must order.

Mjadra: organic green lentils and rice with onions and jalapeño, served with avocado and caramelized onions.  ($7.50)  These lentil were really nice.  They had a good kick to them, but only enough spice to add flavour.  They were lovely...and so was the tahini sauce drizzled all over top.

Stuffed Eggplant: roasted eggplant stuffed with chickpeas, red pepper, zucchini, red onion, and tomato. Served with labneh yogurt sauce and zaatar.  ($17)  AMAZING!!  This dish blew my mind.  If you're a fellow eggplant lover, this is a must.  Note: if you're vegan, make sure to order the yogurt sauce on the side.
 
The three dishes above were just about right for two people.
 

Tuesday 23 April 2013

For the young at heart...

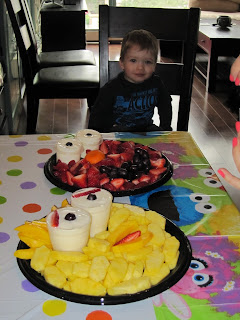
This past weekend I went to a birthday party for one of the cutest two year olds I know.  Not only did all of the kids and adults have fun, but the hostess with the mostess created two of the most amazing fruit platters that I have ever seen...they were Sesame Street characters!!!  I'm not going to lie, every time I took a piece of fruit, I couldn't stop a smile from creeping onto my lips.  And I can vouch that the kids loved them just as much, if not more.  For every trip to the chips and popcorn, there must have been three to Elmo and Big Bird!

So, for all of you with toddlers out there, I highly recommend taking note.  Heck, I think these may end up showing up at my birthday party this year!

Elmo!!  Sliced strawberries for his face, red grapes for his mouth, a mandarin orange for his nose, and containers of french vanilla yogurt with blueberries for his eyes.

Big Bird!!!  Sliced pineapple for his face feathers, sliced mango for his hair feathers, a beak made of mango and strawberries, and containers of coconut yogurt with blueberries and strawberries for eyes.

The birthday boy with his Sesame Street friends! 
 
The facebook picture that inspired the masterpieces above.  Grover and Oscar the Grouch are equally as cool...you could probably even make Oscar out of green grapes if you're not feeling the broccoli.

What Sesame Street birthday party is complete without an Elmo cake?  And, in case you're wondering, it was even more delicious than it looked!

Monday 22 April 2013

It's a marshmallow, it's an igloo building block, it's....

...my homemade baked tofu!  I can't remember who I got this recipe from, but whoever you were, thank you!  Until this recipe came along, I felt completely lost when it came to tofu.  This recipe, however, is flavourful, quick and easy.  I hope you enjoy it as much as I do!
 
Ingredients
  • Firm tofu (I find 1 package is normally good for 3-4 servings)
  • 1-2 tbsp sesame oil
  • 1-2 tbsp soy sauce
  • freshly ground pepper
Pre-heat oven to 400F.  Mix all ingredients, except for the tofu, together.  Cut the tofu into cubes (big or small, your choice).  Lightly coat the tofu in the sauce...I roll each individual piece in it, and place the tofu on a baking sheet.  Place in oven and cook until the tofu is starting to crisp up on the outside (10-20 minutes).  Enjoy!

My homemade baked tofu.

Friday 19 April 2013

Hump night...

I had the greatest hump night ever this week!  An amazing yoga class with a lady who is absolutely lovely on the inside and out, followed by a fabulous catch up and some delicious snacks at Suika Japanese Snackbar.
 
Now, before I get to the food, I just have to say that for all you yogis and non-yogis out there, I have found the yoga class for you.  Hatha yoga at Yyoga South Granville with Whit Hornsberger on Monday and Wednesday nights from 6:45-8.  For the yogis out there, Whit leads a lovely relaxing but energizing hatha class, which leaves your legs tired and your mind ready for bed.  And for you non-yogis, you will still love this class...trust me.  I'm not going to elaborate, but you'll know what I mean after you meet Whit.  (http://www.yyoga.ca/ )

As for Suika Japanese Snackbar...this place is amazing!  I have been walking by its hustling, bustling funness for years and have been wanting to be a part of it, and now I can finally say that I was!  It's even more funky on the inside than it looks from the outside, the people working there are amazing...you can tell they actually like their jobs, the restaurant is full of energy and fun, the food is delicious, and they have a light fixture that I would die to have in my house.  So, do yourself a favour and stop by this fabulous hideaway one night.  You'll thank yourself.

On to the food!

 Corn Kakiage: organic corn niblets fried with cilantro batter, soy sauce and butter.  ($4.80)  A colleague had recommended this dish to me and at first I couldn't believe he recommended the corn but he was so adamant I figured there must be something special about this corn...UNREAL!  It is pretty much the definition of yummy goodness.  Definitely a must try.

Kakuni Bibimbap: stewed pork belly, sweet dried shrimp and scallions on rice served in a hot stone bowl...hot hot hot!!  ($8.80)  When we were asking about the different rice bowls, we were told this dish was one of the most popular on the menu, so we couldn't resist.  It was very yummy and the presentation was so much fun!  It literally came out in a sizzling stone bowl and was mixed right in front of us. 

The frozen grapes that came with our bill.  Talk about brilliant!  Way better than a mint.  Absolutely scrumptious.

Thursday 18 April 2013

A night in, that felt like a night out...

How many of you remember the good old days when you had to leave your house to go rent a movie?  If you're anything like me, you miss those nights.  It turned a night in, into something different from the ordinary.  You can always turn on your TV and change the channel, but going out to grab take-out and a movie was a little mini-adventure.

Well, I have good news.  I have discovered a little gem of a movie store that still rents videos!  They have new, they have old, they have DVDs, they have bluerays...it takes about two minutes to set up a free membership, and the movie costs $6 to rent...which I do believe is $0.99 cheaper than renting directly from your couch.  The name of this fabulous little store is Limelight Video (http://www.limelightvideo.ca/).

After having discovered this gem, a fun take-out and movie night was a must!  I'd been wanting to try Khai Thai for ages, so that made the food decision easy.  The food was delicious, the price reasonable, the service quick, and the folks that worked there were very genuine and kind.  I will definitely be eating more Khai Thai in the future...in fact I think incorporating it into my dinner at the beach routine this summer is a must! 

Pad Thai.  You can't get Thai food and not get Pad Thai.  This Pad Thai was very yummy and tasted pretty darn authentic to me.  ($10.50)

Pad Eggplant: spicy stir fried chicken with eggplant, pepper, and basil leaves.  ($13.95)  This was really nice.  There was spice, but more for flavour than anything.  I was also very impressed with the amount of veggies...the eggplant was delicious!

Spring rolls: vegetables and glass noodles served with plum sauce.  ($6.95)  These were very interesting.  They were not what I was expecting from a spring roll, but they were really nice.  Imagine glass noodles in almost a curry sauce, wrapped in the wrapper and deep fried.  Not your typical spring roll, but yummy nonetheless.
 

Wednesday 17 April 2013

My night with Jamie...

Jamie Oliver that is!!!  Okay, so maybe he wasn't there in person but he was definitely there in spirit.  My starter, main and dessert all came from his cookbooks.  They resulted in an absolutely scrumptious treat of a home-cooked meal, if I do say so myself! 

Starter - Jamie's Crispy Asparagus Soldiers
My parents make a scrumptious variation of this (asparagus wrapped in prosciutto and grilled on the barbeque), so I couldn't resist trying Jamie's version.  Essentially you wrap asparagus in pancetta (singles, or doubles if you have skill), pop them on a baking sheet, drizzle them with olive oil and bake them at 425F until the pancetta is crispy.  Jamie suggested 10 minutes for baking, mine took about 20 minutes.  I'm guessing it was because I was only able to get thickly sliced pancetta. 

Things to note: (1) The pancetta didn't wrap very well, so I ended up tucking the ends underneath to get the pancetta to stay put.  It worked pretty well.  I think the pancetta would have wrapped better if it had been more thinly sliced.  (2) Jamie suggests softboiling an egg and then dipping your Crispy Asparagus Soldiers into the softboiled egg.  I opted to keep this starter very simple and didn't try that, so am not sure how it would taste.  (3) You can find this recipe on page 20 of Cook Your Way to the Good Life (http://www.amazon.ca/Jamie-Home-Cook-Your-Good/dp/0718152433)

I thoroughly enjoyed this appy.  The flavours were awesome together and I especially liked the saltiness of the pancetta.  I will definitely make this again.

 
Main
Up next was Paella!  I love Paella and have always wanted to try making it, so when Jamie's Favourite Paella recipe popped up on his twitter feed the other day, I couldn't resist trying it out.  It was a full on adventure from shopping for the ingredients, to cooking the Paella, to eating it.  The final product turned out flavourful and yummy, and I will definitely make this recipe again but, I'm not going to lie, there was a hiccough along the way...more details below.
 
Things to Note:
  1. You can find the recipe for this yummy goodness at:  http://www.jamieoliver.com/recipes/seafood-recipes/my-favourite-paella  
  2. I halved the online recipe's ingredients and it was good for three very hungry people, or four less hungry people.  
  3. I noticed that in a lot of Jamie's (yes, we're on a first name basis now) paella recipes, he uses pancetta in the same manner that he used the pork belly in this recipe.  So, since I already had pancetta, I substituted it for the pork belly and it tasted pretty darn good.  
  4. I swear it must be easier to buy illegal drugs than saffron.  For you Vancouverite folks, here's a tip: it's held under lock and key at the Customer Service Counter at Whole Foods.  
  5. I had no idea what 200g of tinned tomatoes would be, so I used one small can, which was probably a bit too much.  I'd use 1/2 to 3/4 of a small tin in the future.  
  6. I looked high and low for paella rice and didn't have any luck.  However, as I was phoning around to a gazillion and one stores, I hit the jackpot with a lovely Spanish lady who works at Greens (http://www.greensmarket.ca/home.php).  She told me that when she makes her paella she uses Basmati rice and she prefers it to traditional paella rice because it gives it a nice nutty taste.  So, save yourself some time and use basmati rice!  
  7. Interesting fact: Greens has a bulk section that includes lovely items such as quinoa, buckwheat, goji berries, etc.  
Okay, so what was the hiccough?  For some reason, my rice just wouldn't soften.  I started out by adding the broth suggested in Jamie's recipe and stirring as described, but 20 minutes later I still had rock hard rice.  So, more broth was added and the lid was put on hoping that would help.  20 minutes went by and the rice was still rock hard.  It took about an hour and a half, double the broth recommended and a lot of hoping and wishing, and the rice finally softened enough that it was edible.  It wasn't perfect, but there were no complaints and my dinner guest went back for seconds, so it must not have been horrible.  I'm convinced I must have got some bad rice, but in case it was due to the fact that I used basmati instead of paella rice, ensure you give yourself a little extra cooking time.

I'm cooking Paella, I'm cooking Paella!

Look at that yummy goodness!

On to the plate you go!  One of my favourite parts was the squid.  I'd never cooked squid before and it was absolutely delightful.

Dessert
For dessert I opted for one of my all-time favourite Jamie recipes: Clementine Chocolate Salad  from Jamie's Kitchen (http://www.amazon.ca/Jamies-Kitchen-Jamie-Oliver/dp/1401300227).  This dessert is heavenly.  It's refreshing, light, sweet, flavourful and just ever so lovely!  For those of you that don't have Jamie's Kitchen, I've included my version of the recipe below.  However, I must warn you, many an elephant died in the making of this dessert. 

Ingredients
  • Clementine oranges - this is going to make up the bulk of the dessert, so select the number you need based on the size of the oranges, the number of people and the portion size you want to serve. 
  • Fresh mint, approximately 3 leaves per person, chopped fine
  • Slivered almonds
  • Shaved bittersweet or dark chocolate
  • 6 tbsp sugar
  • 5 tbsp water
  • 1 vanilla bean (you can use pure vanilla extract instead, but the vanilla bean is truly heavenly)
Peel the clementines and then slice them so you end up with clementine circles.  Mix the clementines with the mint.  This can be done ahead of time and put in the fridge for later.  Place the clementine and mint mixture onto the individual serving plates and sprinkle with slivered almonds.  Next, slice the vanilla bean in half and, with the back of the knife, scrape the vanilla goodness out of the bean. Place the sugar and water into a small pan or pot and bring to a boil over medium heat.  Add the vanilla bean goodness, mix oh so slightly and then simmer until the mixture becomes syrupy and golden brown.  Drizzle the golden brown syrup over the clementine salad, sprinkle with shaved chocolate and serve.  I could eat this all night, every night!

Interesting fact: if you place the left over vanilla pod into a container of sugar, it will turn the sugar into lovely vanilla sugar. 

Just looking at this makes me want more!
 
Warning: the following photo is graphic.  Mature audiences only.
The elephant graveyard.

Tuesday 16 April 2013

A ray of sunshine on a rainy Vancouver day...

I was out for my lunch-time walk when I made the greatest discovery ever: The Reef has opened a food truck at Thurlow and Cordova!!!  That combined with my re-found food truck fever...nothing was going to keep me away from The Reef Mobile...not even pouring rain!

The Reef's food truck did not disappoint.  The food was just as yummy as at the restaurant, they had their home-made ginger beer (delicious!), the individuals manning the truck were super helpful, and the service was very quick.  Not to mention, they were nothing short of brilliant when designing The Reef Mobile and the side of the truck turns into an awning.  Brilliance!

So, if you're feeling like a taste of the caribbean or an extra ray of sunshine one day...you should make your way to The Reef Mobile. 

The truck, the menu of yummy goodness, and the greatest umbrella ever!

Word to the wise, food trucking on a rainy day takes some serious skill.  There's nothing easy about trying to hold a Reef Mobile box, a ginger beer and an umbrella all at once.  Luckily we made it to the food court a okay with no loss of precious food.

My Tobago Wrap, Plantain Chips with Jerk Mayo and Ginger Beer combo.  ($12.50)  The Tobago Wrap had curry & lime marinated chicken breast with fresh tomato salsa, organic greens & avocado yogurt in a flour tortilla.  This wrap was absolutely scrumptious!  My only wish is that they would sell a bigger version with double the fillings, because that would be perfect for lunch.  Mind you, then I wouldn't have room for the plantain chips...and they're so darn yummy! 

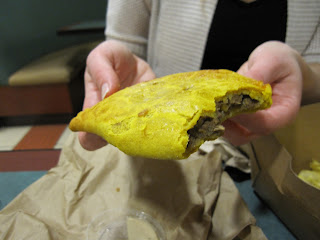
My lovely lunching parnter's Jamaican Patty, Plantain Chips with Jerk Mayo and a Ginger Beer.  ($8.50) 

 The inner workings of the vegetarian Jamaican patty made with housemade Tofu.  My lunching partner enjoyed this Jamaican patty, but enjoyed it more dipped in the jerk mayo.
 
The hidden secrets of the yummy in my tummy Tobago wrap.

Seriously the best ginger beer ever!